Introduction to Faux Bamboo Molding
Faux bamboo molding transforms ordinary trim into exotic accents through three core steps: texturing your base material, layering bamboo-toned paint, and precision installation. This process bypasses real bamboo’s limitations by using accessible woods or synthetics. However, it demands meticulous measuring, sanding, and sealing to achieve authentic organic depth. This decorative trim mimics the appearance of bamboo poles, adding a touch of elegance and uniqueness to walls, ceilings, and even furniture like cupboards and drawers. Having worked on several strips of faux bamboo projects, I’ve found that it’s a versatile style that complements various interior designs.

Unlike real bamboo, which can be difficult to shape and install, faux bamboo molding offers bamboo-like qualities with easier handling. It’s an excellent choice for those looking to incorporate bamboo molding into their next bamboo project without the complexities associated with molding large bamboo.
Materials and Tools Required
Gathering the right materials and tools before starting the project is crucial. In my experience, having everything prepared beforehand makes the process smoother and more enjoyable.
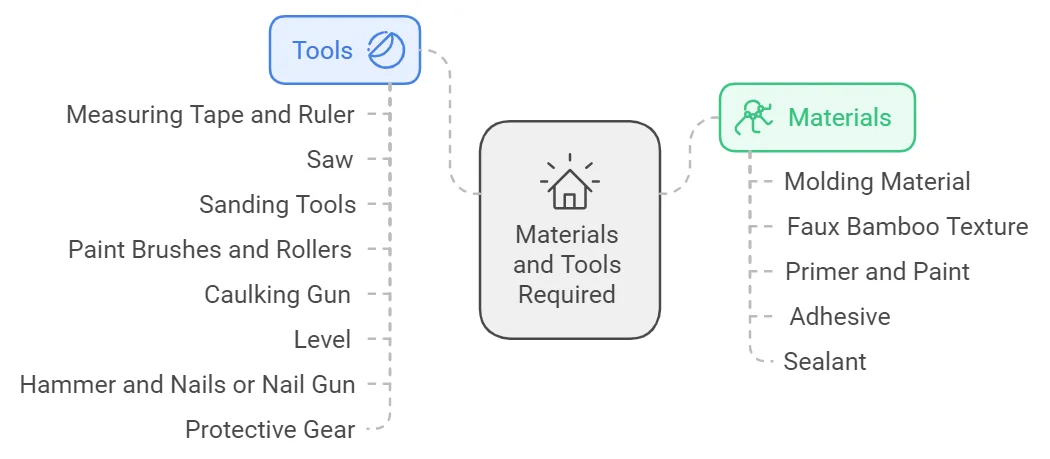
Materials:
- Molding Material: Wood molding, such as MDF (Medium-Density Fiberboard), polyurethane, or plastic molding. Each material offers different textures and durability.
- Faux Bamboo Texture: Achieve this using wood veneer, bamboo-style pictures, or textured decorative tiles.
- Primer and Paint: Use a good-quality wood primer for your chosen material. Select paints in bamboo colors—green, tan, or brown. Spray paint can offer a smooth finish.
- Adhesive: High-strength adhesive glue or caulk/glue for securing materials.
- Sealant: A clear varnish or stain to protect and finish the molding.
Tools:
- Measuring Tape and Ruler: For accurate measurements of your custom cabinetry or wall spaces.
- Saw: A miter saw or a knife for precise cuts.
- Sanding Tools: Sandpaper (grit levels 120 to 220) or an electric sander to sand rough edges.
- Paint Brushes and Rollers: Various sizes for applying primer and paint. A brush is essential for detailed work.
- Caulking Gun: For applying adhesive.
- Level: Ensures your molding is installed straight.
- Hammer and Nails or Nail Gun: For securing molding to surfaces.
- Protective Gear: Gloves, safety glasses, and a dust mask.
Preparing Your Workspace
Preparation sets the foundation for a successful project. Here’s how to get your workspace ready:

A. Clear the Area
Remove furniture and cover the floor with drop cloths to protect against dust and paint spills. This is especially important when working near a faux wood floor or other delicate surfaces.
B. Measure and Mark
- Measure Surfaces: Use a measuring tape to determine the lengths and heights where the faux bamboo molding will be installed.
- Mark Studs and Lines: Locate wall studs or the edges of cupboards and mark them. This ensures secure attachment.
C. Prepare the Molding Material
- Cutting: Cut the molding pieces based on measurements. A miter saw helps make accurate cuts at corners.
- Sanding: Sand the edges and surfaces with sandpaper to smooth out any imperfections. Starting with a lower grit sandpaper and moving to a higher grit ensures a smooth finish.
- Priming: Apply a primer to the molding pieces. This step is essential for paint adhesion, especially on wooden molding.
Creating the Faux Bamboo Design
Creating a convincing faux bamboo texture is both an art and a science. Here’s how I’ve successfully achieved a realistic look:
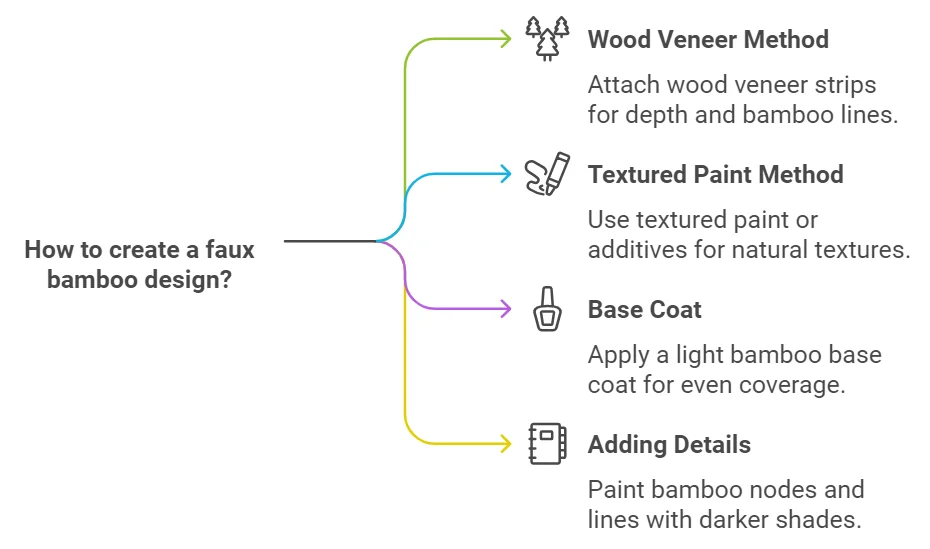
A. Texturing the Molding
- Wood Veneer Method:
- Attach wood veneer strips with adhesive glue to the molding.
- The veneer adds depth and mimics bamboo lines.
- Textured Paint Method:
- Use textured paint or add texture additives to regular paint.
- Apply with a brush or sponge to create natural bamboo textures.
B. Painting Techniques
- Base Coat:
- Apply a base coat in a light bamboo color using a paintbrush or spray paint for even coverage.
- Adding Details:
- Use a finer brush to paint bamboo nodes and lines with darker shades.
- Incorporate bamboo relief patterns for added realism.
- Shading and Highlights:
- Dry brushing techniques with lighter colors can highlight raised areas.
- This adds depth and brings out the texture of the faux bamboo.
C. Sealing the Finish
After the paint dries, apply a clear sealant or stain to protect the surface and enhance the colors. This step gives the molding a polished look and ensures durability.
Installation Process

Installing the faux bamboo molding is a rewarding phase where your hard work starts to come together.

A. Dry Fitting
- Test Placement: Position the molding pieces without adhesive to ensure they fit perfectly.
- Adjust as Needed: Make any necessary cuts or sanding to achieve a seamless fit.
B. Applying Adhesive
- Adhesive Application: Apply a thin, even layer of adhesive glue or caulk/glue to the back of the molding.
- Avoid Excess: Too much adhesive can cause a mess and make the molding slip.
C. Positioning and Securing
- Place Carefully: Press the molding onto the surface, aligning it with your measurements.
- Secure: Use finishing nails or a nail gun to hold the molding in place. Ensure nails are driven into studs or solid material for stability.
- Leveling: Check with a level to make sure the molding is straight.
D. Sealing Joints and Nail Holes
- Fill Gaps: Use wood putty to fill gaps, nail holes, or imperfections.
- Sand Smooth: After the putty dries, sand the areas with fine-grit sandpaper for a smooth finish.
- Touch-Up Painting: Paint over the filled areas to match the rest of the molding.
Finishing Touches
The little details can elevate your faux bamboo molding from good to exceptional.
A. Decorative Accents
- Corner Enhancements: Add bamboo thang elements or decorative trim to corners for a polished look.
- Complementary Fixtures: Consider installing bamboo-style picture frames or furniture to tie the room together.
B. Integration with Decor
- Color Coordination: Choose wall colors and accessories that complement the bamboo molding.
- Lighting: Install lighting that highlights the texture and details of the molding.
C. Personal Insights
Custom elements like young bamboo panels or decorative tiles can make your project stand out. Feel free to get creative and create something unique that reflects your style.
Maintenance and Care
Proper care will keep your faux bamboo molding fresh for years.

A. Cleaning
- Regular Dusting: Use a soft brush or cloth to remove dust.
- Deep Cleaning: Occasionally wipe down with a damp cloth. Avoid harsh chemicals that could damage the finish.
B. Touch-Ups
- Inspect Regularly: Check for any chips or scratches.
- Repair Promptly: Use wood putty and touch-up paint to fix minor damages.
C. Environmental Considerations
- Humidity Control: Keep the area dry to prevent warping, especially when using wood components.
- Sunlight Exposure: Limit direct sunlight to prevent fading of colors.
Benefits of Faux Bamboo Molding
Choosing faux bamboo molding comes with several advantages.
A. Aesthetic Appeal
- Exotic Look: Brings a touch of the tropics into your home.
- Versatility: Complements both modern and traditional designs.
B. Durability
- Long-Lasting Materials: Options like plastic molding or manufactured bamboo are wear-resistant.
- Low Maintenance: Requires minimal upkeep compared to real bamboo.
C. Cost-Effective
- Affordable Materials: Using pulverized wood or MDF can be more budget-friendly.
- DIY Friendly: With homemade efforts, you can save on labor costs.
D. Eco-Friendly
- Sustainable Choices: Faux materials reduce the need for real bamboo harvesting.
- Recyclable Options: Some materials are recyclable, making it a greener choice.
Conclusion
Embarking on a faux bamboo molding project is fulfilling and transformative for your living space. With careful planning, the right materials, and creativity, you can achieve a stunning result that mimics the beauty of real bamboo.
I’ve found that projects like this enhance a home’s aesthetic and provide a sense of accomplishment. Whether revamping an IKEA kitchen Sektion with bamboo trim or adding decorative trim to custom cabinetry, the possibilities are endless.
Remember, the key is in the details—taking the time to sand, paint, and finish your molding will make all the difference. So grab your brush, pick out your favorite style, and create something extraordinary. Happy bambooing!
This post may contain affiliate links, which means I may receive a commission for purchases made through the links. I will only recommend products that I have personally used! Learn more on my Disclosure page!